https://gitee.com/fakerlove/rabbitmqRabbitMQ 实战教程
1.MQ引言
1.1 什么是MQ
MQ(Message Quene) : 翻译为 消息队列,通过典型的 生产者和消费者模型,生产者不断向消息队列中生产消息,消费者不断的从队列中获取消息。因为消息的生产和消费都是异步的,而且只关心消息的发送和接收,没有业务逻辑的侵入,轻松的实现系统间解耦。别名为 消息中间件 通过利用高效可靠的消息传递机制进行平台无关的数据交流,并基于数据通信来进行分布式系统的集成。
1.2 MQ有哪些
当今市面上有很多主流的消息中间件,如老牌的ActiveMQ、RabbitMQ,炙手可热的Kafka,阿里巴巴自主开发RocketMQ等。
1.3 不同MQ特点
1) ActiveMQ
ActiveMQ 是Apache出品,最流行的,能力强劲的开源消息总线。它是一个完全支持JMS规范的的消息中间件。丰富的API,多种集群架构模式让ActiveMQ在业界成为老牌的消息中间件,在中小型企业颇受欢迎!
2) Kafka
Kafka是LinkedIn开源的分布式发布-订阅消息系统,目前归属于Apache顶级项目。Kafka主要特点是基于Pull的模式来处理消息消费,追求高吞吐量,一开始的目的就是用于日志收集和传输。0.8版本开始支持复制,不支持事务,对消息的重复、丢失、错误没有严格要求,适合产生大量数据的互联网服务的数据收集业务。
3)RocketMQ
RocketMQ是阿里开源的消息中间件,它是纯Java开发,具有高吞吐量、高可用性、适合大规模分布式系统应用的特点。RocketMQ思路起源于Kafka,但并不是Kafka的一个Copy,它对消息的可靠传输及事务性做了优化,目前在阿里集团被广泛应用于交易、充值、流计算、消息推送、日志流式处理、binglog分发等场景。
4)RabbitMQ
RabbitMQ是使用Erlang语言开发的开源消息队列系统,基于AMQP协议来实现。AMQP的主要特征是面向消息、队列、路由(包括点对点和发布/订阅)、可靠性、安全。AMQP协议更多用在企业系统内对数据一致性、稳定性和可靠性要求很高的场景,对性能和吞吐量的要求还在其次。
RabbitMQ比Kafka可靠,Kafka更适合IO高吞吐的处理,一般应用在大数据日志处理或对实时性(少量延迟),可靠性(少量丢数据)要求稍低的场景使用,比如ELK日志收集。
2.RabbitMQ 的安装
2.1 安装包下载安装
2.2.1 下载
rabbitmq 是基于 erlang 编程语言的,所以需要环境的
首先注意系统版本,自己的服务器是linux 还是windows
下面的网址是下载erlang 的
https://www.erlang-solutions.com/resources/download.html下面的比较慢
https://www.erlang.org/downloads下面是下载rabbitmq 的
https://www.rabbitmq.com/download.html
最新版本: 3.7.18
2.2.2 下载的安装包

注意:这里的安装包是centos7安装的包
2.2.3 安装步骤
erlang-22.0.7-1.el7.x86_64.rpm
rabbitmq-server-3.7.18-1.el7.noarch.rpm
rpm安装方式
就需要三个rpm 格式的东西
rpm -ivh erlang-22.0.7-1.el7.x86_64.rpm
rpm -ivh socat-1.7.3.2-2.el7.x86_64.rpm
rpm -ivh rabbitmq-server-3.7.18-1.el7.noarch.rpm
yum 安装方式
- 安装erlang需要的依赖环境
# 添加仓库
curl -s https://packagecloud.io/install/repositories/rabbitmq/erlang/script.rpm.sh | sudo bash
Detected operating system as centos/8.
# 安装erlang
dnf install erlang- 安装socat
wget http://www.dest-unreach.org/socat/download/socat-1.7.0.1.tar.gz
tar -zxvf socat-1.7.0.1.tar.gz
cd socat-1.7.0.1
./configure --disable-fips
make && make install# 如果是centos 8
http://www.dest-unreach.org/socat/download/socat-1.7.4.0.tar.gz- 安装 logrotate
yum -y install logrotate问题
centos 7 的socat.rpm
bashwget http://repo.iotti.biz/CentOS/7/x86_64/socat-1.7.3.2-5.el7.lux.x86_64.rpm
二、导入密钥
rpm --import https://github.com/rabbitmq/signing-keys/releases/download/2.0/rabbitmq-release-signing-key.asc三、在/etc/yum.repos.d目录下添加rabbitmq.repo文件,内容如下:
[bintray-rabbitmq-server]
name=bintray-rabbitmq-rpm
baseurl=https://dl.bintray.com/rabbitmq/rpm/rabbitmq-server/v3.8.x/el/8/
gpgcheck=0
repo_gpgcheck=0
enabled=1
centos7 的配置
[bintray-rabbitmq-server]
name=bintray-rabbitmq-rpm
baseurl=https://dl.bintray.com/rabbitmq/rpm/rabbitmq-server/v3.8.x/el/7/
gpgcheck=0
repo_gpgcheck=0
enabled=1yum install -y rabbitmq-server-3.7.18-1.el7.noarch.rpmcp /usr/share/doc/rabbitmq-server-3.7.18/rabbitmq.config.example /etc/rabbitmq/rabbitmq.config注意:默认安装完成后配置文件模板在:/usr/share/doc/rabbitmq-server-3.7.18/rabbitmq.config.example目录中,需要 将配置文件复制到/etc/rabbitmq/目录中,并修改名称为rabbitmq.config
ls /etc/rabbitmq/rabbitmq.configvim /etc/rabbitmq/rabbitmq.config
将上图中配置文件中红色部分去掉%%,以及最后的,逗号 修改为下图:

rabbitmq-plugins enable rabbitmq_management出现如下说明: Enabling plugins on node rabbit@localhost: rabbitmq_management The following plugins have been configured: rabbitmq_management rabbitmq_management_agent rabbitmq_web_dispatch Applying plugin configuration to rabbit@localhost... The following plugins have been enabled: rabbitmq_management rabbitmq_management_agent rabbitmq_web_dispatch
set 3 plugins. Offline change; changes will take effect at broker restart.
systemctl start rabbitmq-server
systemctl restart rabbitmq-server
systemctl stop rabbitmq-serversystemctl status rabbitmq-server ● rabbitmq-server.service - RabbitMQ broker
Loaded: loaded (/usr/lib/systemd/system/rabbitmq-server.service; disabled; vendor preset: disabled)
Active: active (running) since 三 2019-09-25 22:26:35 CST; 7s ago
Main PID: 2904 (beam.smp)
Status: "Initialized"
CGroup: /system.slice/rabbitmq-server.service
├─2904 /usr/lib64/erlang/erts-10.4.4/bin/beam.smp -W w -A 64 -MBas ageffcbf -MHas ageffcbf -
MBlmbcs...
├─3220 erl_child_setup 32768
├─3243 inet_gethost 4
└─3244 inet_gethost 4
.........
systemctl disable firewalld
Removed symlink /etc/systemd/system/multi-user.target.wants/firewalld.service.
Removed symlink /etc/systemd/system/dbus-org.fedoraproject.FirewallD1.service.
systemctl stop firewalldhttp://10.15.0.8:15672/
username:  guest
password:  guest
2.2 docker 安装 rabbitmq
下载镜像,并且运行
docker run -d -p 5672:5672 -p 15672:15672 --name rabbitmq rabbitmq:management最新版本的话
docker run -it --rm --name rabbitmq -p 5672:5672 -p 15672:15672 rabbitmq:3-management后台的话
docker run -di --name rabbitmq -p 5672:5672 -p 15672:15672 rabbitmq:3-management访问网址
http://你的主机名(比如localhost):15672/#/2.3 yum 安装
检查谁提供了rabbItmq
yum provides rabbitmq-server安装
yum install rabbitmq-server
# 启动rabbitmq-server
systemctl start rabbitmq-server
# 查看rabbitmq-server状态
systemctl status rabbitmq-server
# 启动web管理功能,端口号15672
rabbitmq-plugins enable rabbitmq_management
# 重启rabbitmq-server
systemctl  restart rabbitmq-server
2.4 RabbitMQ 简介
2.4.1 简介
基于
AMQP协议,erlang语言开发,是部署最广泛的开源消息中间件,是最受欢迎的开源消息中间件之一。

官方教程: https://www.rabbitmq.com/#getstarted
 # AMQP 协议
 		AMQP(advanced message queuing protocol)`在2003年时被提出,最早用于解决金融领不同平台之间的消息传递交互问题。顾名思义,AMQP是一种协议,更准确的说是一种binary wire-level protocol(链接协议)。这是其和JMS的本质差别,AMQP不从API层进行限定,而是直接定义网络交换的数据格式。这使得实现了AMQP的provider天然性就是跨平台的。以下是AMQP协议模型:
2.4.2 应用场景
RabbitMQ除了像兔子一样跑的很快以外,还有这些特点:
- 开源、性能优秀,稳定性保障
- 提供可靠性消息投递模式、返回模式
- 与Spring AMQP完美整合,API丰富
- 集群模式丰富,表达式配置,HA模式,镜像队列模型
- 保证数据不丢失的前提做到高可靠性、可用性
MQ典型应用场景:
- 异步处理。把消息放入消息中间件中,等到需要的时候再去处理。
- 流量削峰。例如秒杀活动,在短时间内访问量急剧增加,使用消息队列,当消息队列满了就拒绝响应,跳转到错误页面,这样就可以使得系统不会因为超负载而崩溃。
- 日志处理
- 应用解耦。假设某个服务A需要给许多个服务(B、C、D)发送消息,当某个服务(例如B)不需要发送消息了,服务A需要改代码再次部署;当新加入一个服务(服务E)需要服务A的消息的时候,也需要改代码重新部署;另外服务A也要考虑其他服务挂掉,没有收到消息怎么办?要不要重新发送呢?是不是很麻烦,使用MQ发布订阅模式,服务A只生产消息发送到MQ,B、C、D从MQ中读取消息,需要A的消息就订阅,不需要了就取消订阅,服务A不再操心其他的事情,使用这种方式可以降低服务或者系统之间的耦合。
2.4.3 AMQP协议
提到RabbitMQ,就不得不提AMQP协议。AMQP协议是具有现代特征的二进制协议。是一个提供统一消息服务的应用层标准高级消息队列协议,是应用层协议的一个开放标准,为面向消息的中间件设计。
先了解一下AMQP协议中间的几个重要概念:
- Server:接收客户端的连接,实现AMQP实体服务。
- Connection:连接,应用程序与Server的网络连接,TCP连接。
- Channel:信道,消息读写等操作在信道中进行。客户端可以建立多个信道,每个信道代表一个会话任务。
- Message:消息,应用程序和服务器之间传送的数据,消息可以非常简单,也可以很复杂。有Properties和Body组成。Properties为外包装,可以对消息进行修饰,比如消息的优先级、延迟等高级特性;Body就是消息体内容。
- Virtual Host:虚拟主机,用于逻辑隔离。一个虚拟主机里面可以有若干个Exchange和Queue,同一个虚拟主机里面不能有相同名称的Exchange或Queue。
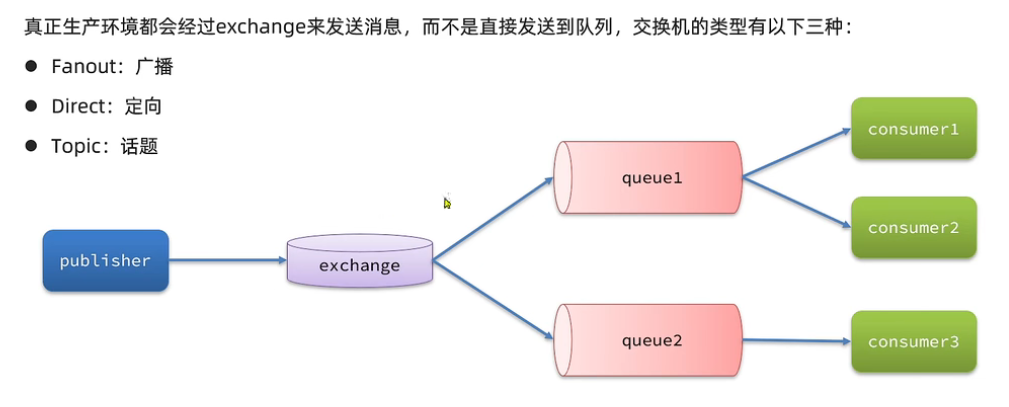
- Exchange:交换器,接收消息,按照路由规则将消息路由到一个或者多个队列。如果路由不到,或者返回给生产者,或者直接丢弃。RabbitMQ常用的交换器常用类型有direct、topic、fanout、headers四种,后面详细介绍。
- Binding:绑定,交换器和消息队列之间的虚拟连接,绑定中可以包含一个或者多个RoutingKey。
- RoutingKey:路由键,生产者将消息发送给交换器的时候,会发送一个RoutingKey,用来指定路由规则,这样交换器就知道把消息发送到哪个队列。路由键通常为一个“.”分割的字符串,例如“com.rabbitmq”。
- Queue:消息队列,用来保存消息,供消费者消费。
我们完全可以直接使用 Connection 就能完成信道的工作,为什么还要引入信道呢?
试想这样一个场景, 一个应用程序中有很多个线程需要从 RabbitMQ 中消费消息,或者生产消息,那么必然需要建立很多个 Connection,也就是许多个 TCP 连接。然而对于操作系统而言,建立和销毁 TCP 连接是非常昂贵的开销,如果遇到使用高峰,性能瓶颈也随之显现。 RabbitMQ 采用 TCP 连接复用的方式,不仅可以减少性能开销,同时也便于管理 。
下图是AMQP的协议模型:

正如图中所看到的,AMQP协议模型有三部分组成:生产者、消费者和服务端。
生产者是投递消息的一方,首先连接到Server,建立一个连接,开启一个信道;然后生产者声明交换器和队列,设置相关属性,并通过路由键将交换器和队列进行绑定。同理,消费者也需要进行建立连接,开启信道等操作,便于接收消息。
接着生产者就可以发送消息,发送到服务端中的虚拟主机,虚拟主机中的交换器根据路由键选择路由规则,然后发送到不同的消息队列中,这样订阅了消息队列的消费者就可以获取到消息,进行消费。
最后还要关闭信道和连接。
RabbitMQ是基于AMQP协议实现的,其结构如下图所示,和AMQP协议简直就是一模一样。

2.4.4 常用交换器
RabbitMQ常用的交换器类型有direct、topic、fanout、headers四种。
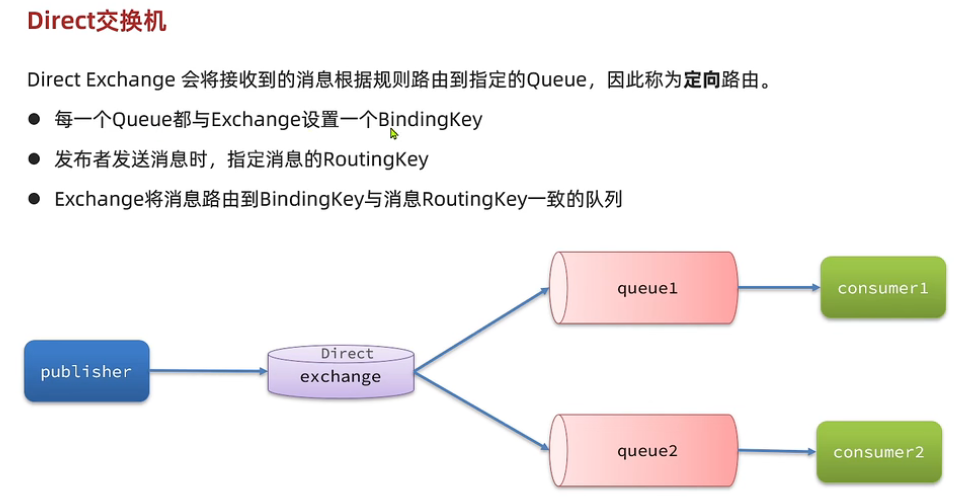
Direct Exchange
该类型的交换器将所有发送到该交换器的消息被转发到RoutingKey指定的队列中,也就是说路由到BindingKey和RoutingKey完全匹配的队列中。

Topic Exchange
该类型的交换器将所有发送到Topic Exchange的消息被转发到所有RoutingKey中指定的Topic的队列上面。
Exchange将RoutingKey和某Topic进行模糊匹配,其中“”用来匹配一个词,“#”用于匹配一个或者多个词。例如“com.#”能匹配到“com.rabbitmq.oa”和“com.rabbitmq”;而"login."只能匹配到“com.rabbitmq”。

Fanout Exchange
该类型不处理路由键,会把所有发送到交换器的消息路由到所有绑定的队列中。优点是转发消息最快,性能最好。

Headers Exchange
该类型的交换器不依赖路由规则来路由消息,而是根据消息内容中的headers属性进行匹配。headers类型交换器性能差,在实际中并不常用。
3. 配置
3.1 rabbitmq 所有命令
rabbitmq-defaults     rabbitmq-env          rabbitmq-queues       rabbitmq-upgrade      rabbitmqctl
rabbitmq-diagnostics  rabbitmq-plugins      rabbitmq-server       rabbitmqadmin
有这么多命令
3.2 命令介绍
启动
rabbitmq-server后台启动
rabbitmq-server -detached查看状态
rabbitmqctl status关闭
rabbitmqctl stop所有ctl 指令
Help:

   autocomplete                  Provides command name autocomplete variants
   help                          Displays usage information for a command
   version                       Displays CLI tools version

Nodes:

   await_startup                 Waits for the RabbitMQ application to start on the target node
   reset                         Instructs a RabbitMQ node to leave the cluster and return to its virgin state
   rotate_logs                   Instructs the RabbitMQ node to perform internal log rotation
   shutdown                      Stops RabbitMQ and its runtime (Erlang VM). Monitors progress for local nodes. Does not require a PID file path.
   start_app                     Starts the RabbitMQ application but leaves the runtime (Erlang VM) running
   stop                          Stops RabbitMQ and its runtime (Erlang VM). Requires a local node pid file path to monitor progress.
   stop_app                      Stops the RabbitMQ application, leaving the runtime (Erlang VM) running
   wait                          Waits for RabbitMQ node startup by monitoring a local PID file. See also 'rabbitmqctl await_online_nodes'

Cluster:

   await_online_nodes            Waits for <count> nodes to join the cluster
   change_cluster_node_type      Changes the type of the cluster node
   cluster_status                Displays all the nodes in the cluster grouped by node type, together with the currently running nodes
   force_boot                    Forces node to start even if it cannot contact or rejoin any of its previously known peers
   force_reset                   Forcefully returns a RabbitMQ node to its virgin state
   forget_cluster_node           Removes a node from the cluster
   join_cluster                  Instructs the node to become a member of the cluster that the specified node is in
   rename_cluster_node           Renames cluster nodes in the local database
   update_cluster_nodes          Instructs a cluster member node to sync the list of known cluster members from <seed_node>

Replication:

   cancel_sync_queue             Instructs a synchronising mirrored queue to stop synchronising itself
   sync_queue                    Instructs a mirrored queue with unsynchronised mirrors (follower replicas) to synchronise them

Users:

   add_user                      Creates a new user in the internal database
   authenticate_user             Attempts to authenticate a user. Exits with a non-zero code if authentication fails.
   change_password               Changes the user password
   clear_password                Clears (resets) password and disables password login for a user
   delete_user                   Removes a user from the internal database. Has no effect on users provided by external backends such as LDAP
   list_users                    List user names and tags
   set_user_tags                 Sets user tags

Access Control:

   clear_permissions             Revokes user permissions for a vhost
   clear_topic_permissions       Clears user topic permissions for a vhost or exchange
   list_permissions              Lists user permissions in a virtual host
   list_topic_permissions        Lists topic permissions in a virtual host
   list_user_permissions         Lists permissions of a user across all virtual hosts
   list_user_topic_permissions   Lists user topic permissions
   list_vhosts                   Lists virtual hosts
   set_permissions               Sets user permissions for a vhost
   set_topic_permissions         Sets user topic permissions for an exchange

Monitoring, observability and health checks:

   list_bindings                 Lists all bindings on a vhost
   list_channels                 Lists all channels in the node
   list_ciphers                  Lists cipher suites supported by encoding commands
   list_connections              Lists AMQP 0.9.1 connections for the node
   list_consumers                Lists all consumers for a vhost
   list_exchanges                Lists exchanges
   list_hashes                   Lists hash functions supported by encoding commands
   list_queues                   Lists queues and their properties
   list_unresponsive_queues      Tests queues to respond within timeout. Lists those which did not respond
   ping                          Checks that the node OS process is up, registered with EPMD and CLI tools can authenticate with it
   report                        Generate a server status report containing a concatenation of all server status information for support purposes
   schema_info                   Lists schema database tables and their properties
   status                        Displays status of a node

Parameters:

   clear_global_parameter        Clears a global runtime parameter
   clear_parameter               Clears a runtime parameter.
   list_global_parameters        Lists global runtime parameters
   list_parameters               Lists runtime parameters for a virtual host
   set_global_parameter          Sets a runtime parameter.
   set_parameter                 Sets a runtime parameter.

Policies:

   clear_operator_policy         Clears an operator policy
   clear_policy                  Clears (removes) a policy
   list_operator_policies        Lists operator policy overrides for a virtual host
   list_policies                 Lists all policies in a virtual host
   set_operator_policy           Sets an operator policy that overrides a subset of arguments in user policies
   set_policy                    Sets or updates a policy

Virtual hosts:

   add_vhost                     Creates a virtual host
   clear_vhost_limits            Clears virtual host limits
   delete_vhost                  Deletes a virtual host
   list_vhost_limits             Displays configured virtual host limits
   restart_vhost                 Restarts a failed vhost data stores and queues
   set_vhost_limits              Sets virtual host limits
   trace_off
   trace_on

Configuration and Environment:

   decode                        Decrypts an encrypted configuration value
   encode                        Encrypts a sensitive configuration value
   environment                   Displays the name and value of each variable in the application environment for each running application
   set_cluster_name              Sets the cluster name
   set_disk_free_limit           Sets the disk_free_limit setting
   set_log_level                 Sets log level in the running node
   set_vm_memory_high_watermark  Sets the vm_memory_high_watermark setting

Definitions:

   export_definitions            Exports definitions in JSON or compressed Erlang Term Format.
   import_definitions            Imports definitions in JSON or compressed Erlang Term Format.

Feature flags:

   enable_feature_flag           Enables a feature flag on target node
   list_feature_flags            Lists feature flags

Operations:

   close_all_connections         Instructs the broker to close all connections for the specified vhost or entire RabbitMQ node
   close_connection              Instructs the broker to close the connection associated with the Erlang process id
   eval                          Evaluates a snippet of Erlang code on the target node
   eval_file                     Evaluates a file that contains a snippet of Erlang code on the target node
   exec                          Evaluates a snippet of Elixir code on the CLI node
   force_gc                      Makes all Erlang processes on the target node perform/schedule a full sweep garbage collection
   resume_listeners              Resumes client connection listeners making them accept client connections again
   suspend_listeners             Suspends client connection listeners so that no new client connections are accepted

Queues:

   delete_queue                  Deletes a queue
   purge_queue                   Purges a queue (removes all messages in it)

Deprecated:

   hipe_compile                  DEPRECATED. This command is a no-op. HiPE is no longer supported by modern Erlang versions
   node_health_check             DEPRECATED. Performs intrusive, opinionated health checks on a fully booted node. See https://www.rabbitmq.com/monitoring.html#health-checks instead

Use 'rabbitmqctl help <command>' to learn more about a specific command
所有插件
rabbitmq-plugins list3.3 Web 页面

3.3.1 页面介绍

connections:无论生产者还是消费者,都需要与RabbitMQ建立连接后才可以完成消息的生产和消费,在这里可以查看连接情况channels:通道,建立连接后,会形成通道,消息的投递获取依赖通道。Exchanges:交换机,用来实现消息的路由Queues:队列,即消息队列,消息存放在队列中,等待消费,消费后被移除队列。
3.3.2 Admin用户和虚拟主机管理
添加用户

超级管理员(administrator)可登陆管理控制台,可查看所有的信息,并且可以对用户,策略(policy)进行操作。
监控者(monitoring)可登陆管理控制台,同时可以查看rabbitmq节点的相关信息(进程数,内存使用情况,磁盘使用情况等)
策略制定者(policymaker)可登陆管理控制台, 同时可以对policy进行管理。但无法查看节点的相关信息(上图红框标识的部分)。
普通管理者(management)仅可登陆管理控制台,无法看到节点信息,也无法对策略进行管理。
其他无法登陆管理控制台,通常就是普通的生产者和消费者。
创建虚拟主机

为了让各个用户可以互不干扰的工作,RabbitMQ添加了虚拟主机(Virtual Hosts)的概念。其实就是一个独立的访问路径,不同用户使用不同路径,各自有自己的队列、交换机,互相不会影响。
绑定虚拟主机和用户


4. Java 使用rabbitmq
4.1 直连模型--Helloword


引入依赖
<?xml version="1.0" encoding="UTF-8"?>
<project xmlns="http://maven.apache.org/POM/4.0.0"
         xmlns:xsi="http://www.w3.org/2001/XMLSchema-instance"
         xsi:schemaLocation="http://maven.apache.org/POM/4.0.0 http://maven.apache.org/xsd/maven-4.0.0.xsd">
    <modelVersion>4.0.0</modelVersion>

    <groupId>org.example</groupId>
    <artifactId>helloword</artifactId>
    <version>1.0-SNAPSHOT</version>

    <dependencies>
        <!-- https://mvnrepository.com/artifact/com.rabbitmq/amqp-client -->
        <dependency>
            <groupId>com.rabbitmq</groupId>
            <artifactId>amqp-client</artifactId>
            <version>5.10.0</version>
        </dependency>

    </dependencies>


</project>
创建开发生产者
package com.ak.test;


import com.rabbitmq.client.Channel;
import com.rabbitmq.client.Connection;
import com.rabbitmq.client.ConnectionFactory;
import org.junit.Test;

import java.io.IOException;
import java.util.concurrent.TimeoutException;

public class Provider {

    @Test
    public  void testSendMessage(){
        ConnectionFactory connectionFactory=new ConnectionFactory();
        // 设置主机名
        connectionFactory.setHost("47.100.104.187");
        // 设置端口号
        connectionFactory.setPort(5672);
        // 设置连接的虚拟主机的名字
        connectionFactory.setVirtualHost("/joker");
        // 设置虚拟机的用户名和密码
        connectionFactory.setUsername("joker");
        connectionFactory.setPassword("123456");

        // 获取连接对象 生产者----> 队列

        try {
            // 获取连接对象
            Connection connection=connectionFactory.newConnection();
            // 获取连接中通道
            Channel channel=connection.createChannel();
            // 通道绑定对应消息队列
            /**
             * 参数一:队列名字,队列不存在自动创建
             * 参数二,是否持久化
             * 参数三:是否独占队列 true 是独占队列 ,false 不独占
             * 参数四: 是否在消费完成后删除队列
             * 参数五:额外附加参数
             */
            channel.queueDeclare("hello",false,false,false,null);
            // 发布消息
            /**
             * 参数一:交换机名称
             * 参数二:队列名称
             * 参数三: 传递消息额外设置
             * 参数四:消息的内容
             *
             */
            channel.basicPublish("","hello",null,"hello rabbit".getBytes());
            channel.close();
            connection.close();

        } catch (IOException e) {
            e.printStackTrace();
        } catch (TimeoutException e) {
            e.printStackTrace();
        }finally {

        }


    }
}
发布成功

建立消费者
package com.ak.test;

import com.rabbitmq.client.*;
import org.junit.Test;

import java.io.IOException;
import java.util.concurrent.TimeoutException;

public class MyConsumer {

    public static void main(String[] args) {
        ConnectionFactory connectionFactory=new ConnectionFactory();
        // 设置主机名
        connectionFactory.setHost("47.100.104.187");
        // 设置端口号
        connectionFactory.setPort(5672);
        // 设置连接的虚拟主机的名字
        connectionFactory.setVirtualHost("/joker");
        // 设置虚拟机的用户名和密码
        connectionFactory.setUsername("joker");
        connectionFactory.setPassword("123456");

        // 获取连接对象 生产者----> 队列

        try {
            // 获取连接对象
            Connection connection=connectionFactory.newConnection();
            // 获取连接中通道
            Channel channel=connection.createChannel();
            // 通道绑定对应消息队列
            /**
             * 参数一:队列名字,队列不存在自动创建
             * 参数二,是否持久化
             * 参数三:是否独占队列 true 是独占队列 ,false 不独占
             * 参数四: 是否在消费完成后删除队列
             * 参数五:额外附加参数
             */
            channel.queueDeclare("hello",false,false,false,null);

            // 发布消息
            /**
             * 参数一:队列名称
             * 参数二:开始消费的自动确认机制
             * 参数三: 消费时的回调接口
             *
             */
            channel.basicConsume("",true, new DefaultConsumer(channel){


                /**
                 * 参数回调
                 * @param consumerTag
                 * @param envelope
                 * @param properties
                 * @param body 消息队列中取出的消息
                 * @throws IOException
                 */
                @Override
                public void handleDelivery(String consumerTag, Envelope envelope, AMQP.BasicProperties properties, byte[] body) throws IOException {
                    System.out.println(new String(body));
                }
            });

            channel.close();
            connection.close();

        } catch (IOException e) {
            e.printStackTrace();
        } catch (TimeoutException e) {
            e.printStackTrace();
        }finally {

        }
    }
}
查看是否被消费

工具类
package com.ak.utils;

import com.rabbitmq.client.Channel;
import com.rabbitmq.client.Connection;
import com.rabbitmq.client.ConnectionFactory;


import java.io.IOException;
import java.util.concurrent.TimeoutException;

public class RabbitMQUtils {
    private static ConnectionFactory connectionFactory;
    static {
        connectionFactory=new ConnectionFactory();
        connectionFactory.setHost("47.100.104.187");
        // 设置端口号
        connectionFactory.setPort(5672);
        // 设置连接的虚拟主机的名字
        connectionFactory.setVirtualHost("/joker");
        // 设置虚拟机的用户名和密码
        connectionFactory.setUsername("joker");
        connectionFactory.setPassword("123456");
    }
    public static Connection  getConnection(){
       // ConnectionFactory connectionFactory=new ConnectionFactory();
        // 设置主机名
        try {
            // 获取连接对象
            Connection connection=connectionFactory.newConnection();
            return connection;
        } catch (IOException e) {
            e.printStackTrace();
        } catch (TimeoutException e) {
            e.printStackTrace();
        }finally {

        }

        return  null;
    }

    public static void closeConnectionAndChanel(Channel  channel,Connection connection){
        try {
            if(channel!=null){
                channel.close();
            }
            if(connection!=null){
                connection.close();
            }
        }catch (Exception e){
            e.printStackTrace();
        }
    }
}
使用测试
package com.ak;

import com.ak.utils.RabbitMQUtils;
import com.rabbitmq.client.Channel;
import com.rabbitmq.client.Connection;
import com.rabbitmq.client.ConnectionFactory;

import java.io.IOException;

public class Provider {
    public static void main(String[] args) {

        // 获取连接对象 生产者----> 队列
        try {
            Connection connection= RabbitMQUtils.getConnection();
            Channel channel=connection.createChannel();
            channel.queueDeclare("hello",false,false,false,null);
            channel.basicPublish("","hello",null,"hello rabbit".getBytes());
            RabbitMQUtils.closeConnectionAndChanel(channel,connection);
        } catch (IOException e) {
            e.printStackTrace();
        } finally {

        }

    }
}
项目结构

4.2 work quene 任务模型
Work queues,也被称为(Task queues),任务模型。当消息处理比较耗时的时候,可能生产消息的速度会远远大于消息的消费速度。长此以往,消息就会堆积越来越多,无法及时处理。此时就可以使用work 模型:让多个消费者绑定到一个队列,共同消费队列中的消息。队列中的消息一旦消费,就会消失,因此任务是不会被重复执行的。

角色:
- P:生产者:任务的发布者
- C1:消费者-1,领取任务并且完成任务,假设完成速度较慢
- C2:消费者-2:领取任务并完成任务,假设完成速度快
创建生产者
package com.ak.demo_2;

import com.ak.utils.RabbitMQUtils;
import com.rabbitmq.client.Channel;
import com.rabbitmq.client.Connection;

import java.io.IOException;

public class Provider {
    public static void main(String[] args) {
        Connection connection= RabbitMQUtils.getConnection();
        try {
            Channel channel=connection.createChannel();
            channel.queueDeclare("work",true,false,false,null);
            for(int i=0;i<1000;i++){
                channel.basicPublish("","work",null,("hello"+i).getBytes());
            }
            RabbitMQUtils.closeConnectionAndChanel(channel,connection);
        } catch (IOException e) {
            e.printStackTrace();
        }

    }
}
创建消费者
package com.ak.demo_2;


import com.ak.utils.RabbitMQUtils;
import com.rabbitmq.client.*;

import java.io.IOException;

public class Consumer_1 {
    public static void main(String[] args) {
        try {
            // 获取连接对象
            Connection connection=RabbitMQUtils.getConnection();
            // 获取连接中通道
            Channel channel=connection.createChannel();
            channel.queueDeclare("work",true,false,false,null);
            channel.basicConsume("",true, new DefaultConsumer(channel){
                @Override
                public void handleDelivery(String consumerTag, Envelope envelope, AMQP.BasicProperties properties, byte[] body) throws IOException {
                    System.out.println(new String(body));
                }
            });
           // RabbitMQUtils.closeConnectionAndChanel(channel,connection);
        } catch (IOException e) {
            e.printStackTrace();
        } finally {
        }

    }
}package com.ak.demo_2;
import com.ak.utils.RabbitMQUtils;
import com.rabbitmq.client.*;
import java.io.IOException;
public class Consumer_2 {
public static void main(String[] args) {
try {
// 获取连接对象
Connection connection=RabbitMQUtils.getConnection();
// 获取连接中通道
Channel channel=connection.createChannel();
channel.queueDeclare("work",true,false,false,null);
channel.basicConsume("",true, new DefaultConsumer(channel){
@Override
public void handleDelivery(String consumerTag, Envelope envelope, AMQP.BasicProperties properties, byte[] body) throws IOException {
System.out.println(new String(body));
}
});
// RabbitMQUtils.closeConnectionAndChanel(channel,connection);
} catch (IOException e) {
e.printStackTrace();
} finally {
}
}
}
总结:默认情况下,RabbitMQ将按顺序将每个消息发送给下一个使用者。平均而言,每个消费者都会收到相同数量的消息。这种分发消息的方式称为循环。
消息自动确认机制
如何实现能者多劳的任务模型。需要手动确认信息
package com.ak.demo_2;


import com.ak.utils.RabbitMQUtils;
import com.rabbitmq.client.*;

import java.io.IOException;

public class Consumer_1_Information {
    public static void main(String[] args) {
        try {
            // 获取连接对象
            Connection connection=RabbitMQUtils.getConnection();
            // 获取连接中通道
            Channel channel=connection.createChannel();
            channel.basicQos(1);
            channel.queueDeclare("workquene",true,false,false,null);
            channel.basicConsume("",false, new DefaultConsumer(channel){
                @Override
                public void handleDelivery(String consumerTag, Envelope envelope, AMQP.BasicProperties properties, byte[] body) throws IOException {
                    System.out.println(new String(body));
                    // 手动确认 ,参数1:手动确认信息标识,参数2:false 每次确认一个
                    channel.basicAck(envelope.getDeliveryTag(),false);
                }
            });
           // RabbitMQUtils.closeConnectionAndChanel(channel,connection);
        } catch (IOException e) {
            e.printStackTrace();
        } finally {
        }

    }
}
4.3 fanout 模型

在广播模式下,消息发送流程是这样的:
- 可以有多个消费者
- 每个消费者有自己的queue(队列)
- 每个队列都要绑定到Exchange(交换机)
- 生产者发送的消息,只能发送到交换机,交换机来决定要发给哪个队列,生产者无法决定。
- 交换机把消息发送给绑定过的所有队列
- 队列的消费者都能拿到消息。实现一条消息被多个消费者消费
开发生产者
package com.ak.fanout;

import com.ak.utils.RabbitMQUtils;
import com.rabbitmq.client.Channel;
import com.rabbitmq.client.Connection;

import java.io.IOException;

public class Provider {
    public static void main(String[] args) throws IOException {
        Connection connection= RabbitMQUtils.getConnection();
        Channel channel=connection.createChannel();
        // 参数一:为交换机名称,参数二:fanout 为交换机
        channel.exchangeDeclare("joker","fanout");
        // 发送信息
        channel.basicPublish("joker","",null,"fanout type message".getBytes());

        RabbitMQUtils.closeConnectionAndChanel(channel,connection);

    }
}
开发消费者
package com.ak.fanout;

import com.ak.utils.RabbitMQUtils;
import com.rabbitmq.client.*;

import java.io.IOException;

public class MyConsumer_3 {
    public static void main(String[] args) throws IOException {
        Connection connection = RabbitMQUtils.getConnection();
        Channel channel=connection.createChannel();
        // 通道绑定交换机
        channel.exchangeDeclare("joker","fanout");
        // 临时队列
        String queneName=channel.queueDeclare().getQueue();
        // 绑定交换机和队列
        channel.queueBind(queneName,"joker","");
        // 消费信息
        channel.basicConsume(queneName,true,new DefaultConsumer(channel){

            @Override
            public void handleDelivery(String consumerTag, Envelope envelope, AMQP.BasicProperties properties, byte[] body) throws IOException {
                System.out.println(new String(body));
            }
        });
    }
}
4.4 Routing
4.4.1 直连
在Fanout模式中,一条消息,会被所有订阅的队列都消费。但是,在某些场景下,我们希望不同的消息被不同的队列消费。这时就要用到Direct类型的Exchange。
在Direct模型下:
- 队列与交换机的绑定,不能是任意绑定了,而是要指定一个
RoutingKey(路由key) - 消息的发送方在 向 Exchange发送消息时,也必须指定消息的
RoutingKey。 - Exchange不再把消息交给每一个绑定的队列,而是根据消息的
Routing Key进行判断,只有队列的Routingkey与消息的Routing key完全一致,才会接收到消息
流程:

图解:
- P:生产者,向Exchange发送消息,发送消息时,会指定一个routing key。
- X:Exchange(交换机),接收生产者的消息,然后把消息递交给 与routing key完全匹配的队列
- C1:消费者,其所在队列指定了需要routing key 为 error 的消息
- C2:消费者,其所在队列指定了需要routing key 为 info、error、warning 的消息
我希望只有错误日志的时候,才能存储到磁盘
其他日志在控制台打印
开发生产者
package com.ak.routedirect;

import com.ak.utils.RabbitMQUtils;
import com.rabbitmq.client.Channel;
import com.rabbitmq.client.Connection;

import java.io.IOException;
import java.util.Random;

public class Provider {
    public static void main(String[] args) throws IOException {
        Connection connection= RabbitMQUtils.getConnection();
        Channel channel=connection.createChannel();
        // 参数一:为交换机名称,参数二:fanout 为交换机
        channel.exchangeDeclare("log_router","direct");
        String []routeKey={"error","info","waring","debug"};

        // 发送信息
        for(int i=0;i<10;i++){
            int temp=new Random().nextInt(100)%4;
            channel.basicPublish("log_router",routeKey[temp],null,("发送的信息为 "+routeKey[temp]).getBytes());
        }
        RabbitMQUtils.closeConnectionAndChanel(channel,connection);

    }
}
开发消费者
package com.ak.routedirect;

import com.ak.utils.RabbitMQUtils;
import com.rabbitmq.client.*;

import java.io.IOException;

public class Consumer_1 {
    public static void main(String[] args) throws IOException {
        Connection connection= RabbitMQUtils.getConnection();
        // 获取连接中通道
        Channel channel=connection.createChannel();
        channel.exchangeDeclare("log_router","direct");
        // 临时队列
        String queneName=channel.queueDeclare().getQueue();
        // 绑定交换机和队列
        channel.queueBind(queneName,"log_router","error");
        // 消费信息
        channel.basicConsume(queneName,true,new DefaultConsumer(channel){

            @Override
            public void handleDelivery(String consumerTag, Envelope envelope, AMQP.BasicProperties properties, byte[] body) throws IOException {
                System.out.println("消费者2 "+new String(body));
            }
        });
    }
}package com.ak.routedirect;
import com.ak.utils.RabbitMQUtils;
import com.rabbitmq.client.*;
import java.io.IOException;
public class Consumer_2 {
public static void main(String[] args) throws IOException {
Connection connection= RabbitMQUtils.getConnection();
// 获取连接中通道
Channel channel=connection.createChannel();
channel.exchangeDeclare("log_router","direct");
// 临时队列
String queneName=channel.queueDeclare().getQueue();
// 绑定交换机和队列
channel.queueBind(queneName,"log_router","error");
channel.queueBind(queneName,"log_router","info");
channel.queueBind(queneName,"log_router","waring");
channel.queueBind(queneName,"log_router","debug");
// 消费信息
channel.basicConsume(queneName,true,new DefaultConsumer(channel){
@Override
public void handleDelivery(String consumerTag, Envelope envelope, AMQP.BasicProperties properties, byte[] body) throws IOException {
System.out.println("消费者1 "+new String(body));
}
});
}
}检验

4.4.2 Routing 之订阅模型-Topic
Topic类型的Exchange与Direct相比,都是可以根据RoutingKey把消息路由到不同的队列。只不过Topic类型Exchange可以让队列在绑定Routing key 的时候使用通配符!这种模型Routingkey 一般都是由一个或多个单词组成,多个单词之间以”.”分割,例如: item.insert

# 统配符
		* (star) can substitute for exactly one word.    匹配不多不少恰好1个词
		# (hash) can substitute for zero or more words.  匹配一个或多个词
# 如:
		audit.#    匹配audit.irs.corporate或者 audit.irs 等
    audit.*   只能匹配 audit.irs
创建生产者
package com.ak.routeTopic;

import com.ak.utils.RabbitMQUtils;
import com.rabbitmq.client.Channel;
import com.rabbitmq.client.Connection;

import java.io.IOException;
import java.util.Random;

public class Provider {
    public static void main(String[] args) throws IOException {
        Connection connection= RabbitMQUtils.getConnection();
        Channel channel=connection.createChannel();
        // 参数一:为交换机名称,参数二:fanout 为交换机
        String channelName="log_top";
        channel.exchangeDeclare(channelName,"topic");
        String []routeKey={"user.save","user.add","admin.add","admin.save"};

        for (int i=0;i<10;i++){
            int temp=new Random().nextInt(100)%4;
            channel.basicPublish(channelName,routeKey[temp],null,("这个是topics 发布的信息"+routeKey[temp]).getBytes());
        }
        RabbitMQUtils.closeConnectionAndChanel(channel,connection);
    }
}
创建消费者
package com.ak.routeTopic;

import com.ak.utils.RabbitMQUtils;
import com.rabbitmq.client.*;

import java.io.IOException;

public class Consumer_1 {
    public static void main(String[] args) throws IOException {
        Connection connection= RabbitMQUtils.getConnection();
        // 获取连接中通道
        Channel channel=connection.createChannel();
        String channelName="log_top";
        channel.exchangeDeclare(channelName,"topic");
        // 临时队列
        String queneName=channel.queueDeclare().getQueue();
        // 绑定交换机和队列

        channel.queueBind(queneName,channelName,"user.*");
        // 消费信息
        channel.basicConsume(queneName,true,new DefaultConsumer(channel){
            @Override
            public void handleDelivery(String consumerTag, Envelope envelope, AMQP.BasicProperties properties, byte[] body) throws IOException {
                System.out.println("消费者user 的信息 "+new String(body));
            }
        });
    }
}package com.ak.routeTopic;
import com.ak.utils.RabbitMQUtils;
import com.rabbitmq.client.*;
import java.io.IOException;
public class Consumer_2 {
public static void main(String[] args) throws IOException {
Connection connection= RabbitMQUtils.getConnection();
// 获取连接中通道
Channel channel=connection.createChannel();
String channelName="log_top";
channel.exchangeDeclare(channelName,"topic");
// 临时队列
String queneName=channel.queueDeclare().getQueue();
// 绑定交换机和队列
channel.queueBind(queneName,channelName,"admin.*");
// 消费信息
channel.basicConsume(queneName,true,new DefaultConsumer(channel){
@Override
public void handleDelivery(String consumerTag, Envelope envelope, AMQP.BasicProperties properties, byte[] body) throws IOException {
System.out.println("消费者admin 的信息 "+new String(body));
}
});
}
}检查

5. 整合SpringBoot
5.1 helloword 模型
引入依赖
<?xml version="1.0" encoding="UTF-8"?>
<project xmlns="http://maven.apache.org/POM/4.0.0"
         xmlns:xsi="http://www.w3.org/2001/XMLSchema-instance"
         xsi:schemaLocation="http://maven.apache.org/POM/4.0.0 http://maven.apache.org/xsd/maven-4.0.0.xsd">
    <modelVersion>4.0.0</modelVersion>

    <parent>
        <groupId>org.springframework.boot</groupId>
        <artifactId>spring-boot-starter-parent</artifactId>
        <version>2.4.1</version>
        <relativePath/> <!-- lookup parent from repository -->
    </parent>
    <groupId>org.example</groupId>
    <artifactId>demo1</artifactId>
    <version>1.0-SNAPSHOT</version>

    <properties>
        <java.version>11</java.version>
    </properties>
    <dependencies>

        <dependency>
            <groupId>org.springframework.boot</groupId>
            <artifactId>spring-boot-starter-web</artifactId>
        </dependency>


        <!-- https://mvnrepository.com/artifact/org.springframework.boot/spring-boot-starter-amqp -->
        <dependency>
            <groupId>org.springframework.boot</groupId>
            <artifactId>spring-boot-starter-amqp</artifactId>
        </dependency>

        <dependency>
            <groupId>org.springframework.amqp</groupId>
            <artifactId>spring-rabbit-test</artifactId>
            <scope>test</scope>
        </dependency>
        <dependency>
            <groupId>org.springframework.boot</groupId>
            <artifactId>spring-boot-starter-test</artifactId>
            <scope>test</scope>
            <exclusions>
                <exclusion>
                    <groupId>org.junit.vintage</groupId>
                    <artifactId>junit-vintage-engine</artifactId>
                </exclusion>
            </exclusions>
        </dependency>

    </dependencies>

    <build>
        <plugins>
            <plugin>
                <groupId>org.springframework.boot</groupId>
                <artifactId>spring-boot-maven-plugin</artifactId>
            </plugin>
        </plugins>
    </build>

</project>
创建生产者
package com.ak.demo;

import org.junit.jupiter.api.Test;

import org.springframework.amqp.rabbit.core.RabbitTemplate;
import org.springframework.beans.factory.annotation.Autowired;
import org.springframework.boot.test.context.SpringBootTest;
import org.springframework.test.context.junit4.SpringRunner;

@SpringBootTest(classes = RabbitmqSpringApplication.class)
public class MyTest {
    @Autowired
    private RabbitTemplate rabbitTemplate;

    @Test
    public  void test(){
        rabbitTemplate.convertAndSend("hello","hello world");
    }
}
创建消费者
package com.ak.demo.hello;

import org.springframework.amqp.rabbit.annotation.Queue;
import org.springframework.amqp.rabbit.annotation.RabbitHandler;
import org.springframework.amqp.rabbit.annotation.RabbitListener;
import org.springframework.stereotype.Component;

/**
 * 默认持久化队列
 */
@Component
@RabbitListener(queuesToDeclare =@Queue("hello"))
public class HelloCustomer {

    @RabbitHandler
    public void kk(String message){
        System.out.println(message);
    }
}
目录结构

5.2 workquene 模型
修改work 类
 @Test
    public  void test2(){
        for(int i=0;i<10;i++){
            rabbitTemplate.convertAndSend("work","work 模型");
        }
    }
创建消费者
package com.ak.demo.work;

import org.springframework.amqp.rabbit.annotation.Queue;
import org.springframework.amqp.rabbit.annotation.RabbitListener;
import org.springframework.stereotype.Component;

@Component
public class WorkConsumer {

    @RabbitListener(queuesToDeclare =@Queue("work"))
    public void receive(String messaage){
        System.out.println("消费者1---"+messaage);
    }

    @RabbitListener(queuesToDeclare =@Queue("work"))
    public void receive2(String messaage){
        System.out.println("消费者2--"+messaage);
    }
}
创建确认机制
5.3 广播模式
创建生产者
 /**
     * 广播形式的发布信息
     */
    @Test
    public  void test3(){

        for(int i=0;i<10;i++){
            rabbitTemplate.convertAndSend("kk","","广播信息");
        }
    }
创建消费者
package com.ak.demo.fanout;

import org.springframework.amqp.rabbit.annotation.Exchange;
import org.springframework.amqp.rabbit.annotation.Queue;
import org.springframework.amqp.rabbit.annotation.QueueBinding;
import org.springframework.amqp.rabbit.annotation.RabbitListener;
import org.springframework.stereotype.Component;

@Component
public class FanOutConsumer {

    @RabbitListener(bindings = {
            @QueueBinding(
                    value =@Queue,
                    exchange = @Exchange(value = "kk",type = "fanout")
            )
    })
    public void receive(String message){
        System.out.println("----");
        System.out.println("广播信息1"+message);
    }

    @RabbitListener(bindings = {
            @QueueBinding(
                    value =@Queue,
                    exchange = @Exchange(value = "kk",type = "fanout")
            )
    })
    public void receive2(String message){
        System.out.println("----");
        System.out.println("广播信息2"+message);
    }
}
测试

5.4 路由模式
创建生产者
/**
     * 测试路由模型
     */
    @Test
    public void testDirect(){
        String []routeKey={"error","info","waring","debug"};
        for(int i=0;i<10;i++){
            int temp=new Random().nextInt(100)%4;
            rabbitTemplate.convertAndSend("directs",routeKey[temp],routeKey[temp]+"的日志信息");
        }

    }
创建消费者
package com.ak.demo.router;

import org.springframework.amqp.rabbit.annotation.Exchange;
import org.springframework.amqp.rabbit.annotation.Queue;
import org.springframework.amqp.rabbit.annotation.QueueBinding;
import org.springframework.amqp.rabbit.annotation.RabbitListener;
import org.springframework.stereotype.Component;

@Component
public class DirectConsumer {

    String []routeKey={"error","info","waring","debug"};
    @RabbitListener(bindings = {
            @QueueBinding(
                    value = @Queue,// 临时队列
                    exchange = @Exchange(value = "directs",type = "direct"),
                    key={"error","info","waring","debug"}
            )
    })
    public void receive(String message){
        System.out.println("接受全部信息--"+message);
    }


    @RabbitListener(bindings = {
            @QueueBinding(
                    value = @Queue,// 临时队列
                    exchange = @Exchange(value = "directs",type = "direct"),
                    key={"error"}
            )
    })
    public void receive2(String message){
        System.out.println("只接受error--"+message);
    }
}
检查

5.5 Topic 模式(通配符模式)
创建生产者
@Test
    public void testFive(){
        String []routeKey={"user.save","user.add","admin.add","admin.save"};
        for(int i=0;i<10;i++){
            int temp=new Random().nextInt(100)%4;
            rabbitTemplate.convertAndSend("topics",routeKey[temp],routeKey[temp]+"信息");
        }
    }
消费者
package com.ak.demo.topic;

import org.springframework.amqp.rabbit.annotation.Exchange;
import org.springframework.amqp.rabbit.annotation.Queue;
import org.springframework.amqp.rabbit.annotation.QueueBinding;
import org.springframework.amqp.rabbit.annotation.RabbitListener;
import org.springframework.stereotype.Component;

@Component
public class TopicConsumer {

    @RabbitListener(bindings = {
            @QueueBinding(
                    value = @Queue,
                    exchange = @Exchange(name = "topics",type = "topic"),
                    key={"user.*"}
            )
    })
    public void receive(String message){
        System.out.println("user类---"+message);
    }

    @RabbitListener(bindings = {
            @QueueBinding(
                    value = @Queue,
                    exchange = @Exchange(name = "topics",type = "topic"),
                    key={"admin.*"}
            )
    })
    public void receive2(String message){
        System.out.println("admin 类--"+message);
    }
}
测试

6. 搭建集群
6.1 命令行搭建
默认情况下:RabbitMQ代理操作所需的所有数据/状态都将跨所有节点复制。这方面的一个例外是消息队列,默认情况下,消息队列位于一个节点上,尽管它们可以从所有节点看到和访问
架构图

核心解决问题: 当集群中某一时刻master节点宕机,可以对Quene中信息,进行备份
集群搭建
markdown# 0.集群规划 node1: 10.15.0.3 mq1 master 主节点 node2: 10.15.0.4 mq2 repl1 副本节点 node3: 10.15.0.5 mq3 repl2 副本节点 # 1.克隆三台机器主机名和ip映射 vim /etc/hosts加入: 10.15.0.3 mq1 10.15.0.4 mq2 10.15.0.5 mq3 node1: vim /etc/hostname 加入: mq1 node2: vim /etc/hostname 加入: mq2 node3: vim /etc/hostname 加入: mq3 # 2.三个机器安装rabbitmq,并同步cookie文件,在node1上执行: scp /var/lib/rabbitmq/.erlang.cookie root@mq2:/var/lib/rabbitmq/ scp /var/lib/rabbitmq/.erlang.cookie root@mq3:/var/lib/rabbitmq/ # 3.查看cookie是否一致: node1: cat /var/lib/rabbitmq/.erlang.cookie node2: cat /var/lib/rabbitmq/.erlang.cookie node3: cat /var/lib/rabbitmq/.erlang.cookie # 4.后台启动rabbitmq所有节点执行如下命令,启动成功访问管理界面: rabbitmq-server -detached # 5.在node2和node3执行加入集群命令: 1.关闭 rabbitmqctl stop_app 2.加入集群 rabbitmqctl join_cluster rabbit@mq1 3.启动服务 rabbitmqctl start_app # 6.查看集群状态,任意节点执行: rabbitmqctl cluster_status # 7.如果出现如下显示,集群搭建成功: Cluster status of node rabbit@mq3 ... [{nodes,[{disc,[rabbit@mq1,rabbit@mq2,rabbit@mq3]}]}, {running_nodes,[rabbit@mq1,rabbit@mq2,rabbit@mq3]}, {cluster_name,<<"rabbit@mq1">>}, {partitions,[]}, {alarms,[{rabbit@mq1,[]},{rabbit@mq2,[]},{rabbit@mq3,[]}]}] # 8.登录管理界面,展示如下状态: markdown
# 9.测试集群在node1上,创建队列 markdown
# 10.查看node2和node3节点:
 markdown
# 11.关闭node1节点,执行如下命令,查看node2和node3:
	rabbitmqctl stop_app

6.2 docker 搭建

使用docker 进行搭建
删除所有镜像
docker stop myrabbit1 myrabbit2 myrabbit3
docker rm myrabbit1 myrabbit2 myrabbit3
自定义网络
docker network create --driver bridge --subnet 192.168.0.0/24 --gateway 192.168.0.1 myrediswork创建集群
docker run -d --hostname rabbit1 --name myrabbit1 -p 5675:5672 -p 15673:15672 -v ~/mydata/rabbitmq/rabbitmq01:/var/lib/rabbitmq  -e RABBITMQ_ERLANG_COOKIE='rabbitcookie' rabbitmq:3-management
docker run -d --hostname rabbit2 --name myrabbit2 -p 5673:5672 -p 15674:15672 -v ~/mydata/rabbitmq/rabbitmq02:/var/lib/rabbitmq --link myrabbit1:rabbit1 -e RABBITMQ_ERLANG_COOKIE='rabbitcookie' rabbitmq:3-management
docker run -d --hostname rabbit3 --name myrabbit3 -p 5674:5672 -p 15675:15672 -v ~/mydata/rabbitmq/rabbitmq03:/var/lib/rabbitmq --link myrabbit1:rabbit1 --link myrabbit2:rabbit2 -e RABBITMQ_ERLANG_COOKIE='rabbitcookie' rabbitmq:3-management
进入每个集群中,然后运行命令
docker exec -it myrabbit1 /bin/bash
rabbitmqctl stop_app
rabbitmqctl reset
rabbitmqctl start_app
exit
这里主义 myrabbit2 是不一样的
docker exec -it myrabbit2 bash
rabbitmqctl stop_app
rabbitmqctl join_cluster --ram rabbit@rabbit1
rabbitmqctl start_app
exitdocker exec -it myrabbit3 bash
rabbitmqctl stop_app
rabbitmqctl join_cluster --ram rabbit@rabbit1
rabbitmqctl start_app
exit访问网址
http://www.jokerak.com:15673/#/问题
Error response from daemon: Pool overlaps with other one on this address space
192.168.0.0 网段已经被使用了,换个网段即可
7. 安全
7.1 生产者重连
spring:
  rabbitmq:
    host: 192.168.115.190
    virtual-host: /hmall
    username: joker
    password: 123456
    port: 5672
    connection-timeout: 1s
    template:
      retry:
        enabled: true
当网络不稳定的时候,利用重试机制可以有效提高消息发送的成功率。
不过SpringAMQP提供的重试机制是阻塞式的重试,也就是说多次重试等待的过程中,当前线程是被阻塞的,会影响业务性能。 如果对于业务性能有要求,建议禁用重试机制。如果一定要使用,请合理配置等待时长和重试次数,当然也可以考虑使用异步线程来执行发送消息的代码。
7.2 生产者确认
RabbitMQ了Publisher Confirm和Publisher Return两种确认机制。开启确机制认后,在MQ成功收到消息后会返回确认消息给生产者。返回的结果有以下几种情况:
- 消息投递到了MQ,但是路由失败。此时会通过PublisherReturn返回路由异常原因,然后返回ACK,告知投递成功
- 临时消息投递到了MQ,并且入队成功,返回ACK,告知投递成功
- 持久消息投递到了MQ,并且入队完成持久化,返回ACK,告知投递成功
- 其它情况都会返回NACK,告知投递失败
首先配置yml
spring:
  rabbitmq:
    publisher-confirm-type: correlated
    publisher-returns: true
这里publisher-confirm-type有三种模式可选:
- none:关闭confirm机制
- simple:同步阻塞等待MQ的回执消息
- correlated: MQ异步回调方式返回回执消息
 @GetMapping("user")
    public String user() {


        CorrelationData correlationData = new CorrelationData(UUID.randomUUID().toString());
        correlationData.getFuture().addCallback(new ListenableFutureCallback<CorrelationData.Confirm>() {
            @Override
            public void onFailure(Throwable ex) {
                log.info("发送消息失败");
            }

            @Override
            public void onSuccess(CorrelationData.Confirm result) {
                if (result.isAck()) {
                    log.info("发送消息成功");
                } else {
                    log.info("失败" + result.getReason());
                }

            }
        });

        String[] routeKey = {"user.save", "user.add", "admin.add", "admin.save"};
        for (int i = 0; i < 10; i++) {
            int temp = new Random().nextInt(100) % 4;
            rabbitTemplate.convertAndSend("hmall.user", "", new User("abc", temp), correlationData);
        }

        try {
            Thread.sleep(2000);
        } catch (InterruptedException e) {
            throw new RuntimeException(e);
        }

        return "ok";
    }
7. 3 数据持久化
- 交换机持久化
- 队列持久化
- 消息持久化
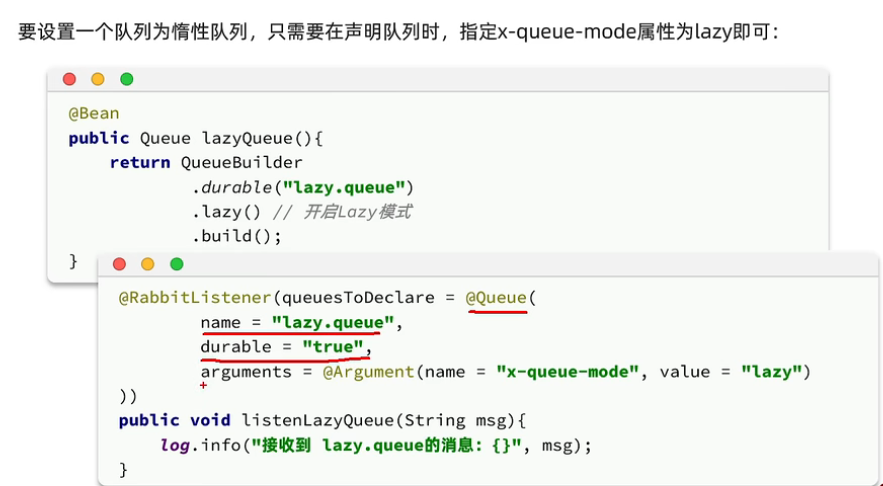
Lazy queue
从RabbitMQ的3.6.0版本开始,就增加了Lazy Queue的概念,也就是惰性队列。惰性队列的特征如下:
- 接收到消息后直接存入磁盘而非内存(内存中只保留最近的消息,默认2048条)
- 消费者要消费消息时才会从磁盘中读取并加载到内存
- 支持数百万条的消息存储
- 在3.12版本后,所有队列都是Lazy Queue模式,无法更改。
消费者确认机制
SpringAMQP已经实现了消息确认功能。并允许我们通过配置文件选择ACK处理方式,有三种方式:
- none:不处理。即消息投递给消费者后立刻ack,消息会立刻从MQ删除。非常不安全,不建议使用
- manual:手动模式。需要自己在业务代码中调用api,发送ack或reject,存在业务入侵,但更灵活
- auto:自动模式。SpringAMQP利用AOP对我们的消息处理逻辑做了环绕增强,当业务正常执行时则自动返回ack.当业务出现异常时,根据异常判断返回不同结果: 如果是业务异常,会自动返回nack 如果是消息处理或校验异常,自动返回reject
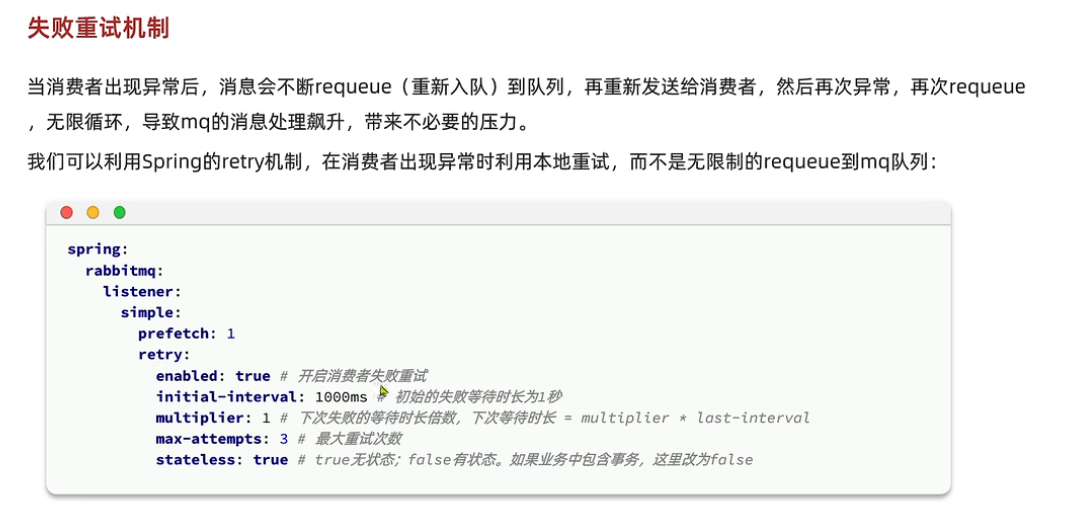
失败重试机制
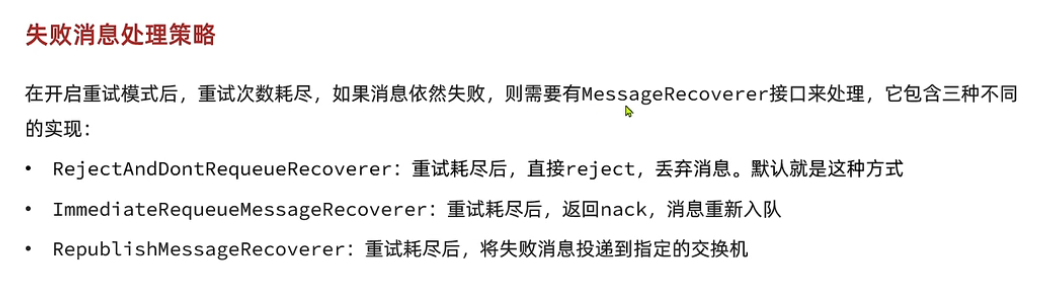
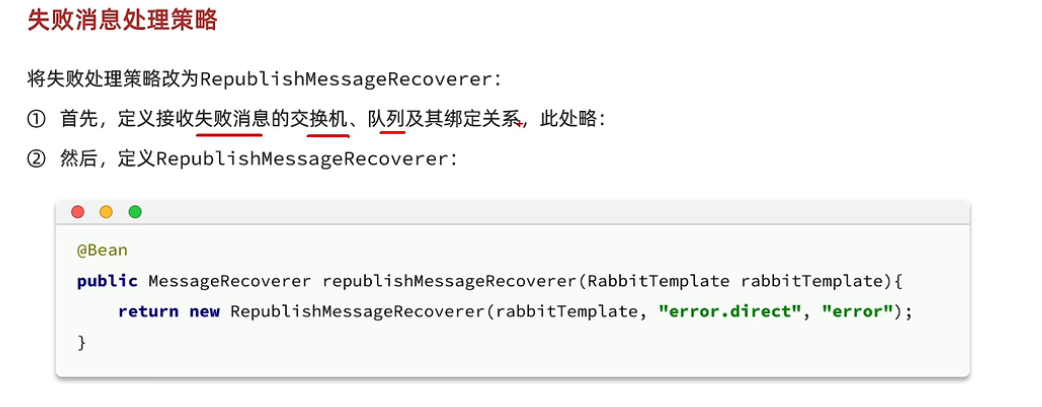
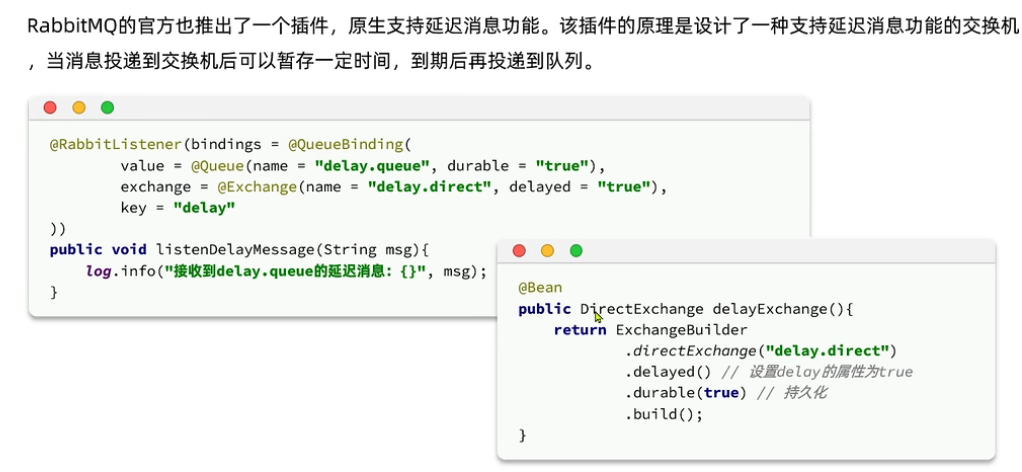
延迟消息
延迟消息:生产者发送消息时指定一个时间,消费者不会立刻收到消息,而是在指定时间之后才收到消息。
死信交换机
当一个队列中的消息满足下列情况之一时,就会成为死信(dead letter) :
- 消费者使用basic.reject或 basic.nack声明消费失败,并且消息的requeue参数设置为false
- 消息是一个过期消息(达到了队列或消息本身设置的过期时间),超时无人消费
- 要投递的队列消息堆积满了,最早的消息可能成为死信
如果队列通过dead-letter-exchange属性指定了一个交换机,那么该队列中的死信就会投递到这个交换机中。这个交换机称为死信交换机(Dead Letter Exchange,简称DLX)。
首先创建队列
package com.example.demo;

import lombok.AllArgsConstructor;
import lombok.extern.slf4j.Slf4j;
import org.springframework.amqp.core.*;
import org.springframework.amqp.rabbit.core.RabbitTemplate;
import org.springframework.beans.BeansException;
import org.springframework.beans.factory.InitializingBean;
import org.springframework.beans.factory.annotation.Autowired;
import org.springframework.context.ApplicationContext;
import org.springframework.context.ApplicationContextAware;
import org.springframework.context.annotation.Bean;
import org.springframework.context.annotation.Configuration;

@Slf4j

@Configuration
@AllArgsConstructor
public class MyConfig implements InitializingBean {

    //    @Autowired
//    RabbitTemplate rabbitTemplate;

    @Override
    public void afterPropertiesSet() throws Exception {
//        log.info("加载了");
//        rabbitTemplate.setReturnsCallback(returnedMessage -> {
//            log.info("写的" + returnedMessage.toString());
//        });
    }


    @Bean
    public Exchange deadExchange() {

        return ExchangeBuilder.topicExchange("dlx.exchange").durable(true).build();

    }


    @Bean
    public Exchange simpleExchange() {

        return ExchangeBuilder.topicExchange("simple.exchange").durable(true).build();

    }

    @Bean
    public Queue simpleQueue() {
        return QueueBuilder.durable("simple.queue")
                .ttl(5000)
                .deadLetterExchange("dlx.exchange")
                .deadLetterRoutingKey("test.dead")
                .build();
    }

    @Bean
    public Binding link(Exchange simpleExchange, Queue simpleQueue) {
        return BindingBuilder.bind(simpleQueue)
                .to(simpleExchange)
                .with("test")
                .noargs();
    }

    @Bean
    public Queue deadQueue() {
        return QueueBuilder.durable("dlx.queue")
                .build();
    }


    @Bean
    public Binding deadLink(Exchange deadExchange,
                            Queue deadQueue) {
        return BindingBuilder.bind(deadQueue)
                .to(deadExchange)
                .with("test.dead.#")
                .noargs();
    }

}
然后发送消息
    @GetMapping("dlx")
    public String dlx() {

        for (int i = 0; i < 100; i++) {
            rabbitTemplate.convertAndSend("simple.exchange", "test", "死信消息" + i);
        }


        return "ok";
    }
接受消息
    @RabbitListener(bindings =
            {@QueueBinding(
                    value = @Queue(value = "dlx.queue", durable = "true", arguments = {
                    }),
                    exchange = @Exchange(value = "dlx.exchange", type = "topic"))

            })
    public void dlx_queue(String msg) {
        log.error("死心交换机接受消息" + msg);
    }
如果不用bean自动注入的话
  @RabbitListener(bindings =
            {@QueueBinding(
                    value = @Queue(value = "dlx.test.queue", durable = "true", arguments = {
//                            @Argument(name = "x-max-length", value = "10",type = "java.lang.Integer"),// 消息条数限制,该参数是非负整数值。限制加入queue中消息的条数。先进先出原则,超过10条后面的消息会顶替前面的消息。
//                                    @Argument(name = "x-max-length-bytes", value = "100",type = "java.lang.Integer"),// 队列消息内容占用最大空间,受限于内存大小,超过该阈值则从队列头部开始删除消息;
                            @Argument(name = "x-message-ttl", value = "5000", type = "java.lang.Integer"), // 消息存活时间.该参数是非负整数值.创建queue时设置该参数可指定消息在该queue中待多久,可根据x-dead-letter-routing-key和x-dead-letter-exchange生成可延迟的死信队列。
//                                    @Argument(name = "x-max-priority", value = "6",type = "java.lang.Integer"),// 消息优先级,创建queue时arguments可以使用x-max-priority参数声明优先级队列。该参数应该是一个整数,表示队列应该支持的最大优先
//                                    @Argument(name = "x-expires", value = "6000",type = "java.lang.Integer"),// 存活时间,创建queue时参数arguments设置了x-expires参数,该queue会在x-expires到期后queue消息,亲身测试直接消失(哪怕里面有未消费的消息)。
                            @Argument(name = "x-dead-letter-exchange", value = "dlx.exchange"),// 创建queue时参数arguments设置了x-dead-Ietter-routing-key和x-dead-letter-exchange,会在x-message-ttl时间到期后把消息放到x-dead-letter-routing-key和x-dead-letter-exchange指定的队列中达到延迟队列的目的
                            @Argument(name = "x-dead-letter-routing-key", value = "test.dead"),// 死信消息路由键,在消息发送到死信交换器时会使用该路由键,如果不设置,则使用消息的原来的路由键值
//                                    @Argument(name = "x-queue-mode", value = "lazy"),
//                                    @Argument(name = "x-overflow", value = "drop-head")// 设置队列溢出行为。这决定了当达到队列的最大长度时消息会发生什么。有效值是drop-head、reject-publish或reject-publish-dlx。仲裁队列类型仅支持drop-head;
                    }),
                    exchange = @Exchange(value = "dlx.exchange.test", type = "topic"),
                    key = {"test.*"}
            ),


            })
    public void dlx_test(String msg) {
        log.error("死心交换机接受消息" + msg);

}x-message-ttl:消息的过期时间,单位:毫秒;x-expires:队列过期时间,队列在多长时间未被访问将被删除,单位:毫秒;x-max-length:队列最大长度,超过该最大值,则将从队列头部开始删除消息;x-max-length-bytes:队列消息内容占用最大空间,受限于内存大小,超过该阈值则从队列头部开始删除消息;x-overflow:设置队列溢出行为。这决定了当达到队列的最大长度时消息会发生什么。有效值是drop-head、reject-publish或reject-publish-dlx。仲裁队列类型仅支持drop-head;x-dead-letter-exchange:死信交换器名称,过期或被删除(因队列长度超长或因空间超出阈值)的消息可指定发送到该交换器中;x-dead-letter-routing-key:死信消息路由键,在消息发送到死信交换器时会使用该路由键,如果不设置,则使用消息的原来的路由键值x-single-active-consumer:表示队列是否是单一活动消费者,true时,注册的消费组内只有一个消费者消费消息,其他被忽略,false时消息循环分发给所有消费者(默认false)x-max-priority:队列要支持的最大优先级数;如果未设置,队列将不支持消息优先级;x-queue-mode(Lazy mode):将队列设置为延迟模式,在磁盘上保留尽可能多的消息,以减少RAM的使用;如果未设置,队列将保留内存缓存以尽可能快地传递消息;x-queue-master-locator:在集群模式下设置镜像队列的主节点信息。
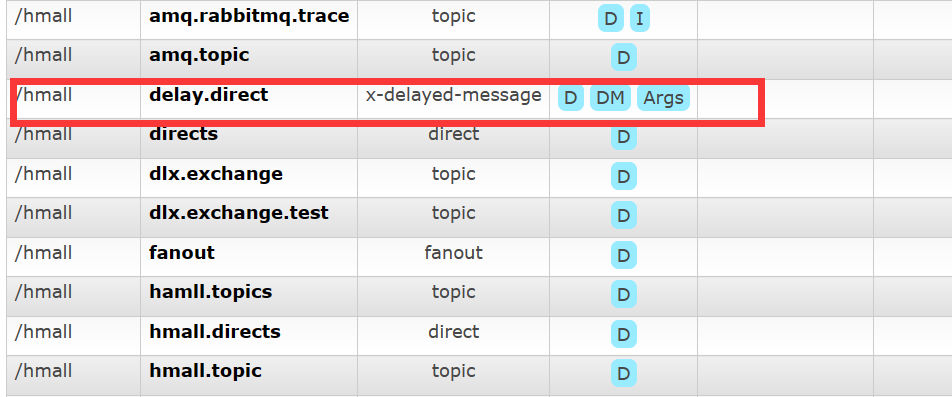
死心交换机插件
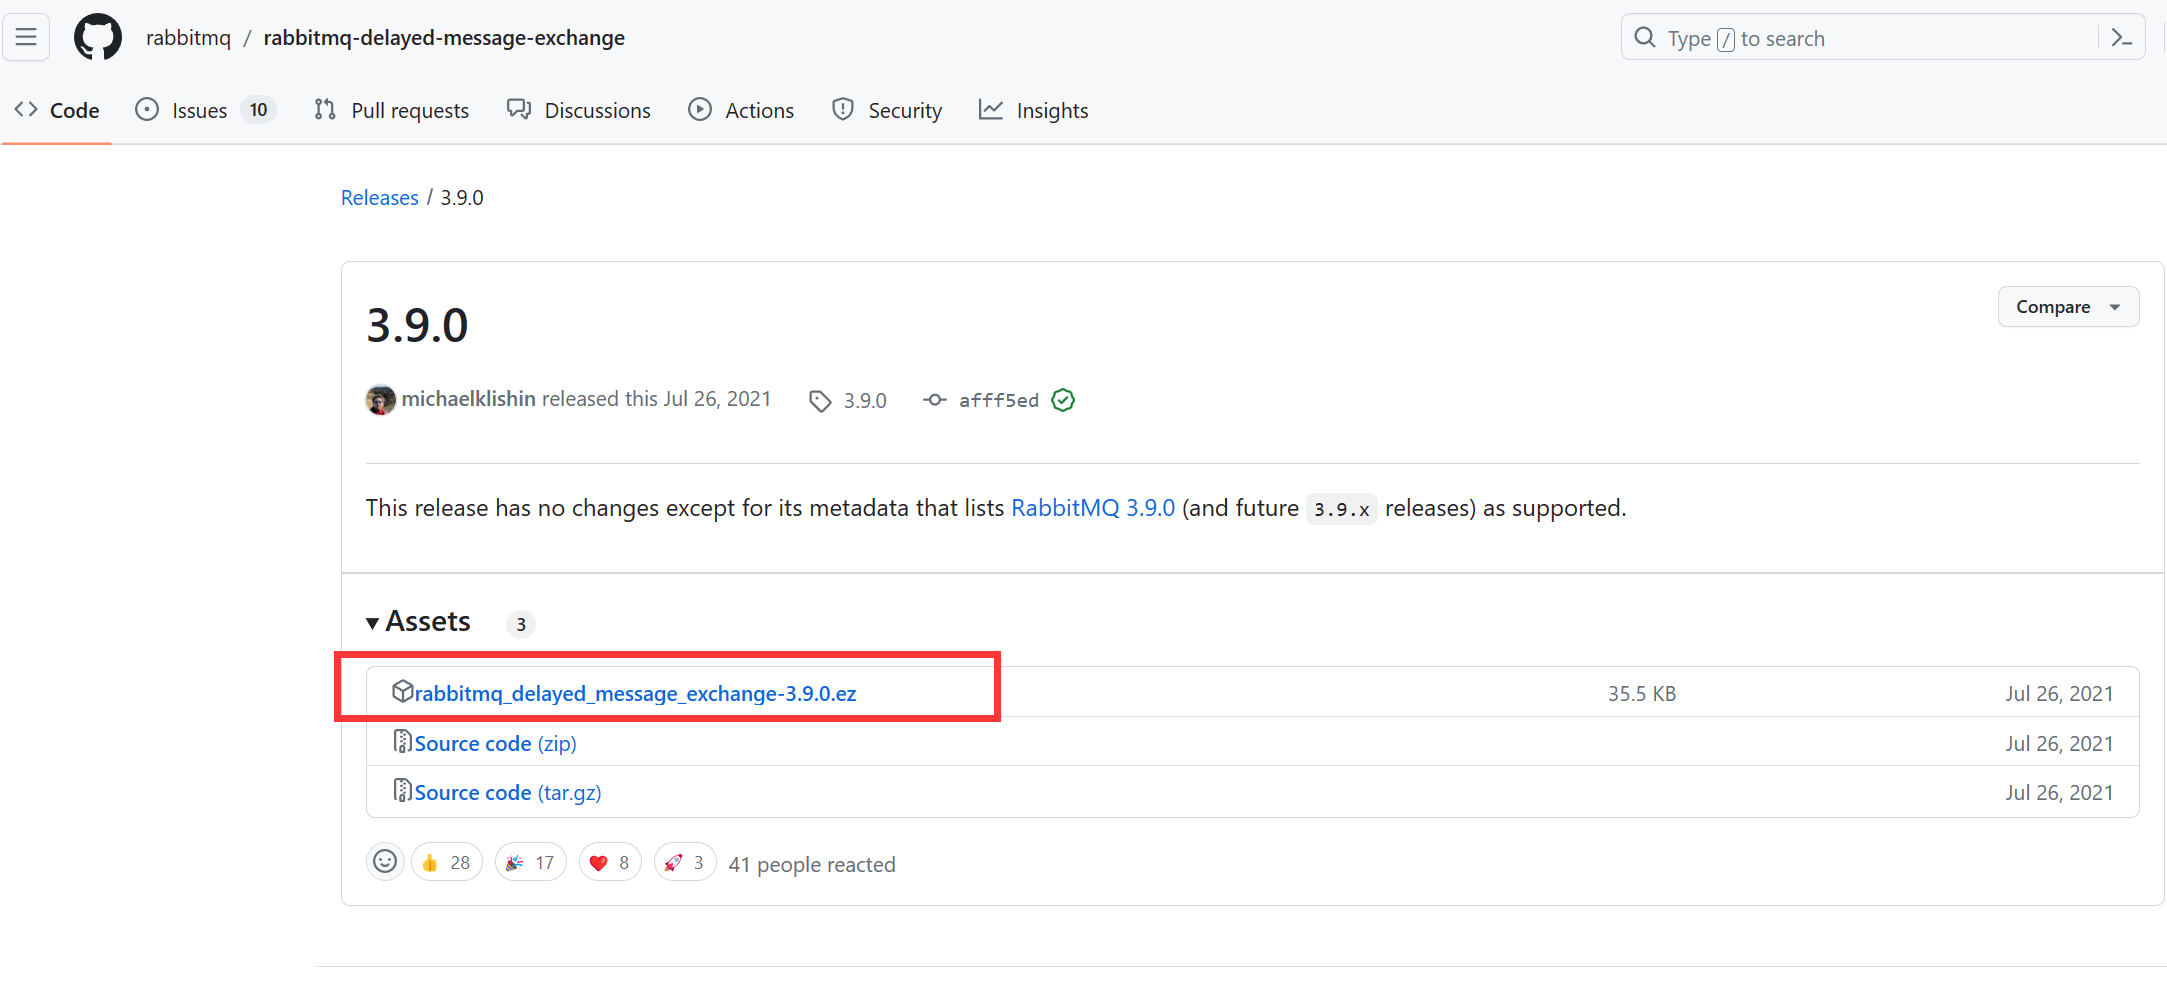
上网搜索
Tags · rabbitmq/rabbitmq-delayed-message-exchange (github.com)
选择对应的版本下载
查看rabbitmq容器,查看容器的名字
docker ps
将插件导入到容器
docker cp rabbitmq_delayed_message_exchange-3.9.0.ez rabbitmq:/opt/rabbitmq/plugins进入容器
docker exec -it rabbitmq /bin/bash进入插件列表查看插件
cd /opt/rabbitmq/plugins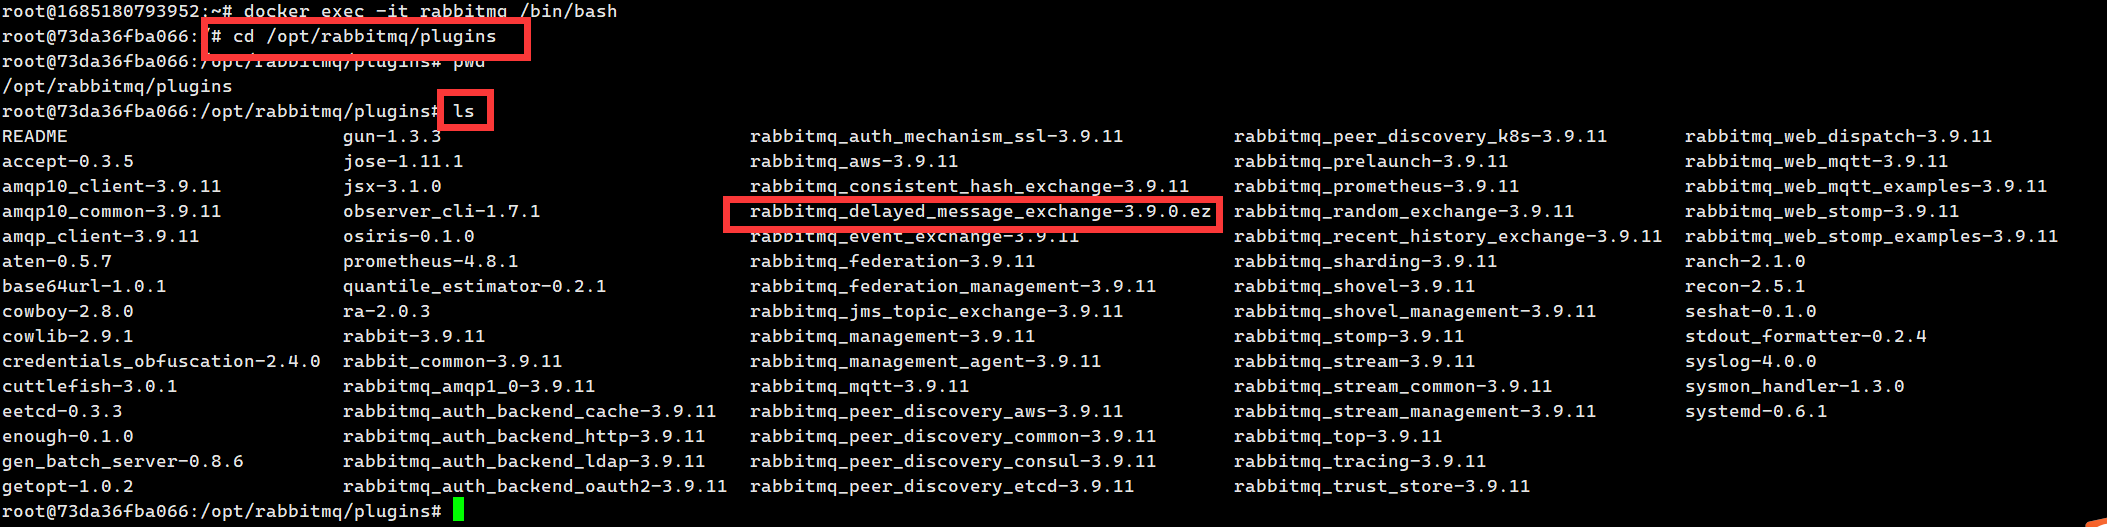
安装消息插件
rabbitmq-plugins enable rabbitmq_shovel rabbitmq_shovel_management
rabbitmq-plugins enable rabbitmq_delayed_message_exchange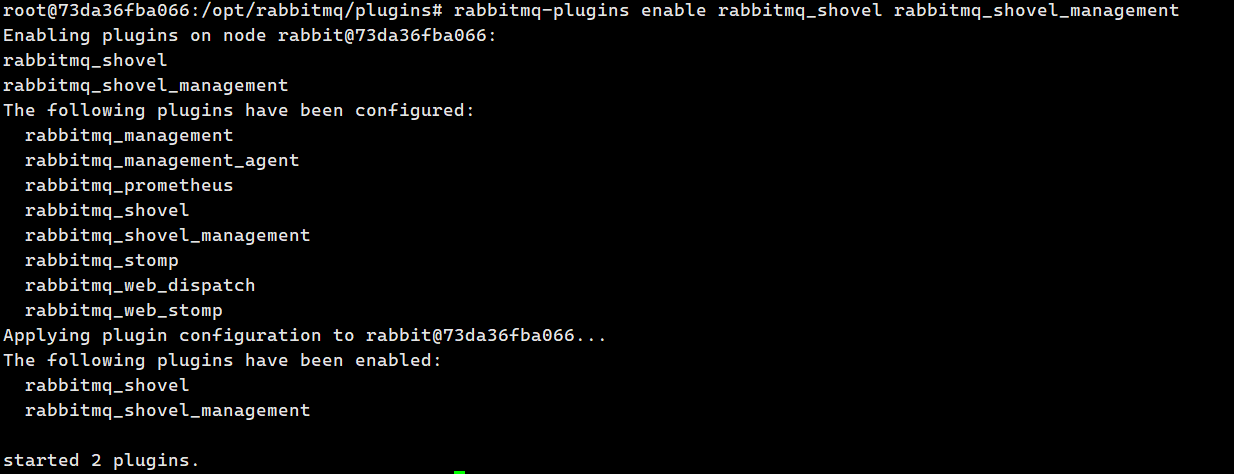
查看插件
rabbitmq-plugins list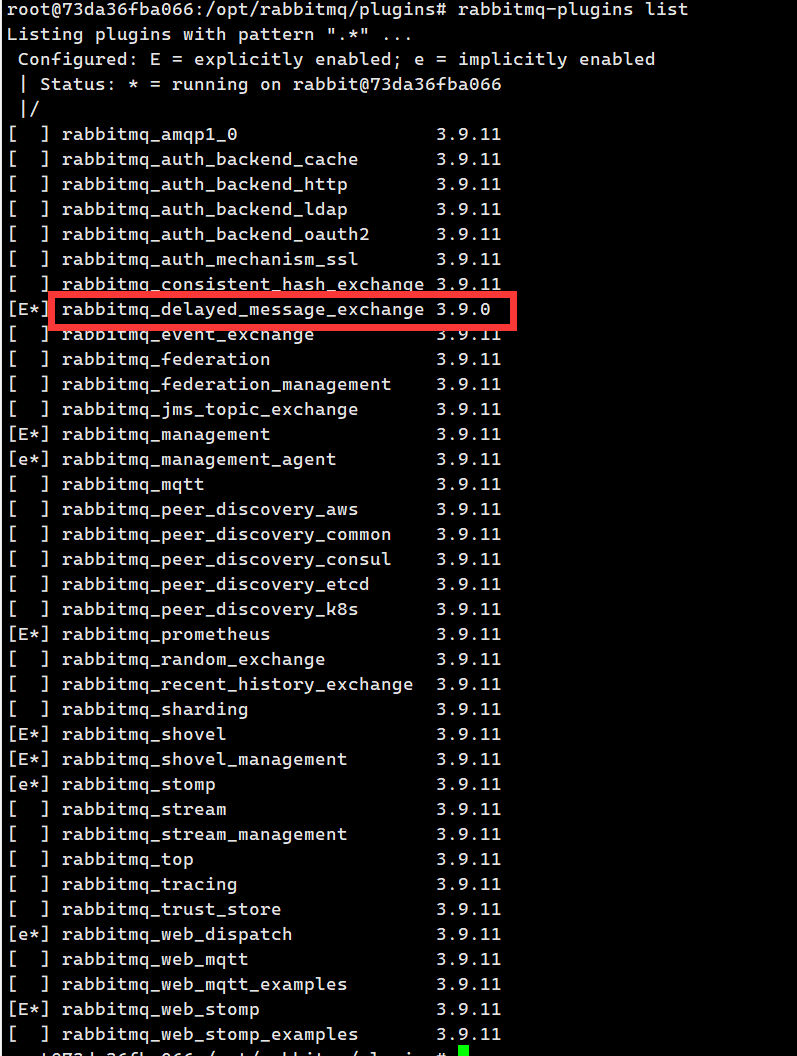
重启软件
systemctl restart rabbitmq-server.service如果显示没有命令,就重启rabbitmq
docker restart rabbitmq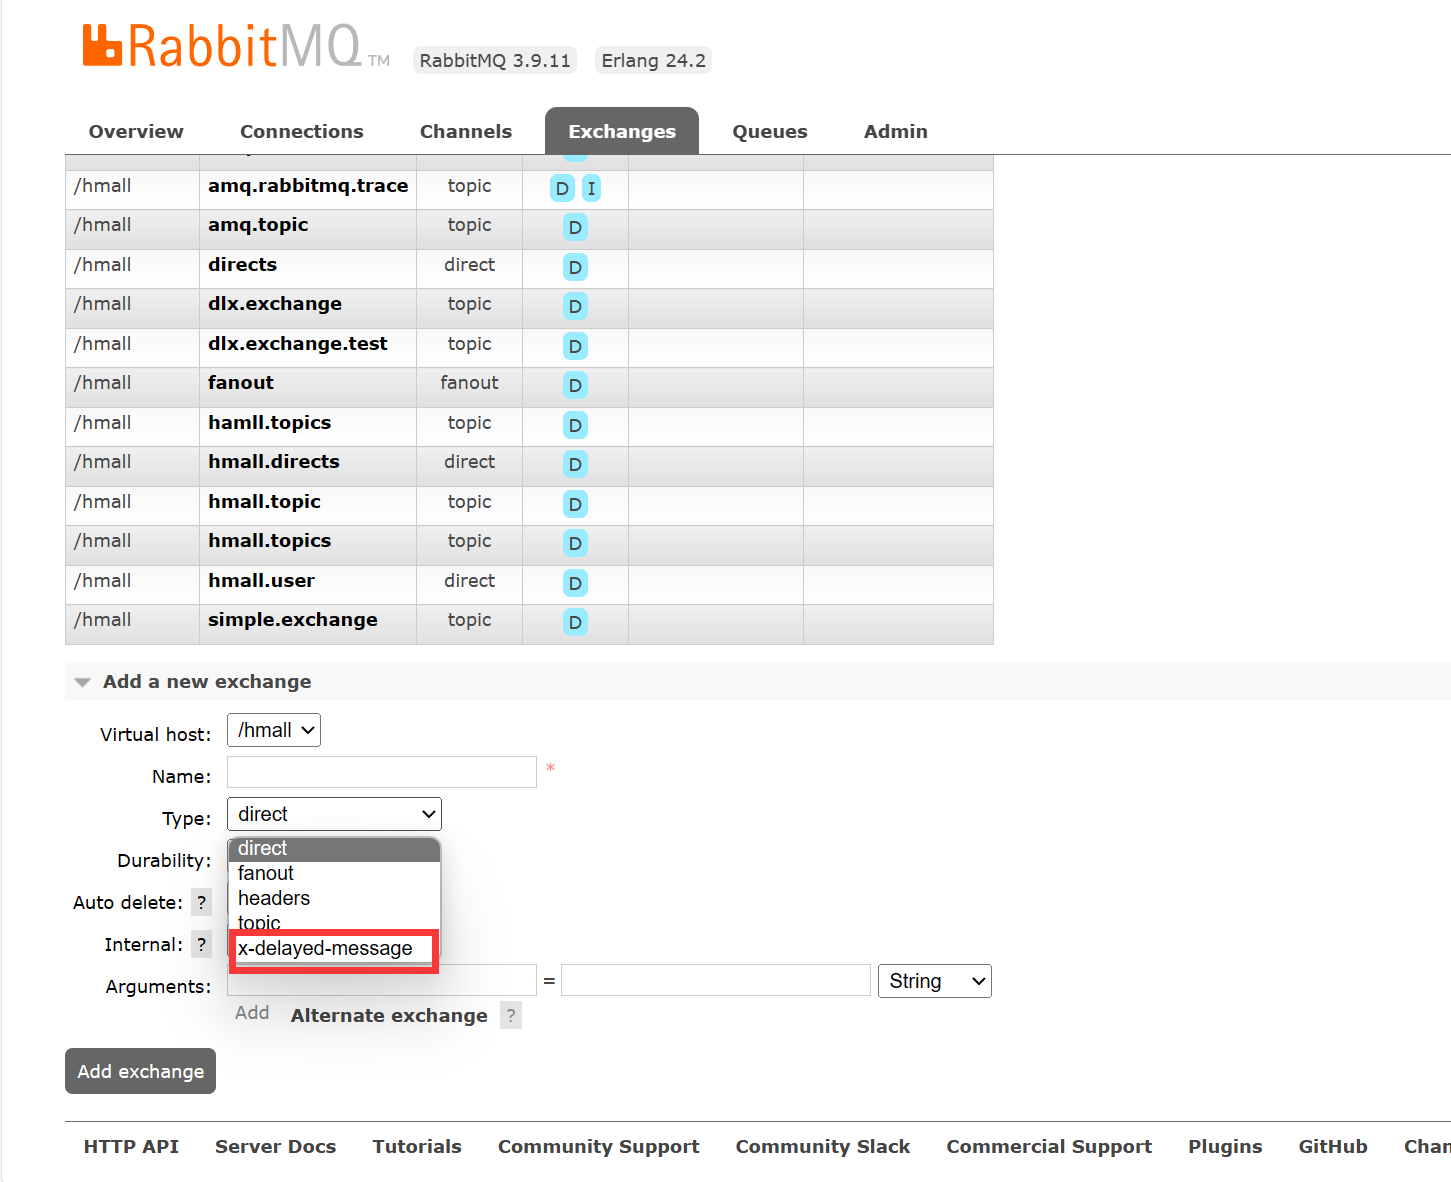
出现这个,就显示安装成功
出现的效果就是
编写监听者
    @RabbitListener(
            bindings = @QueueBinding(
                    value = @Queue(value = "delay.queue", durable = "true"),
                    exchange = @Exchange(value = "delay.direct", durable = "true", delayed = "true"),
                    key = "hi"
            )
    )
    public void dlx_plug(String msg) {
        log.info("延迟队列插件实现方式" + msg);
    }
编写消息发送方
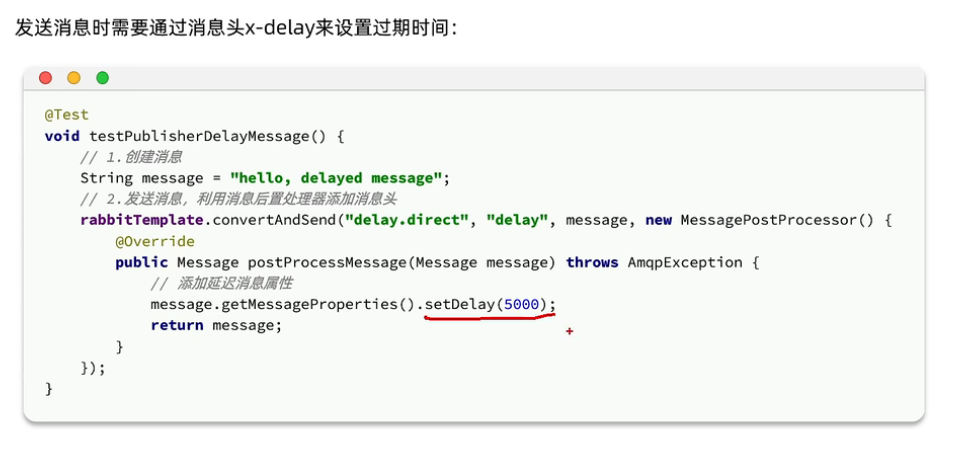
    //    发送延迟队列消息
    @GetMapping("dlx_plug")
    public String dlx_plug() {
        for (int i = 0; i < 5; i++) {
            rabbitTemplate.convertAndSend("delay.direct", "hi", "java代码创建的消息" + i, msg -> {
                //发送消息的时候延迟时长
                msg.getMessageProperties().setDelay(5000);
                return msg;
            });
        }
        log.info("发送完成");
        return "ok";
    }